To take a screenshot on a Gateway laptop, press the “PrtScn” or “Print Scrn” button. This captures the entire screen, copying an image to the clipboard.
If you own a Gateway laptop and need to capture what’s on your screen, taking a screenshot is a simple process. Knowing how to do this can be helpful for various reasons, whether you want to share an error message, capture a social media post, or quickly save an image.
By using the “PrtScn” or “Print Scrn” button, which is located on the top right of the keyboard, you can easily take a screenshot of the entire screen. Once you’ve done this, you can then paste the screenshot into an image editing software or a document. If you’re wondering how to take a screenshot on your Gateway laptop, follow the steps below to capture and save the contents displayed on your screen.
How To Take A Screenshot On Gateway Laptop
When it comes to taking a screenshot on a Gateway laptop, there are several options you can use to capture your screen effectively. One method is by using the “PrtScn” or “Print Scrn” button, which allows you to capture the entire screen. Another way is to press the Windows key along with the “Shift” and “S” keys simultaneously to select a specific area to capture. Additionally, if your Gateway laptop is running on Windows, you can use the built-in Game Bar for screen recording and capturing. It’s important to understand your Gateway laptop’s screenshot capabilities and familiarize yourself with the quick keys and shortcuts for screen capturing to make the process efficient and seamless.
Prerequisites For Taking Screenshots
To take a screenshot on your Gateway laptop, there are a few prerequisites that need to be addressed. Firstly, it’s important to check your laptop’s operating system to ensure the methods for taking a screenshot are compatible. Additionally, keeping your laptop updated with the latest operating system and driver updates is crucial, as these updates can affect the functionality of taking screenshots. By ensuring these prerequisites are met, you can effectively proceed with capturing screenshots on your Gateway laptop.
Keyboard Shortcuts Usage
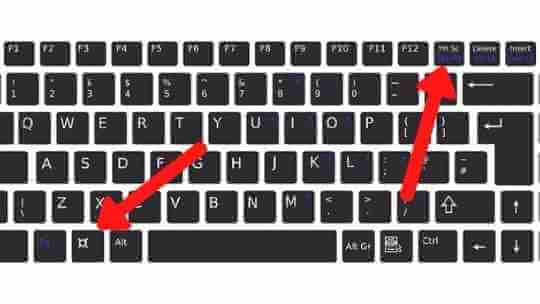
To take a screenshot on a Gateway laptop, you can utilize several keyboard shortcuts. Pressing the Print Screen (PrtScn) button captures the entire screen, while using Alt + PrtScn captures the active window. Additionally, you can use Windows + PrtScn to save screenshots automatically. These shortcuts offer convenient ways to capture and save content from your Gateway laptop screen with ease.
Credit: laptopsidea.com
Snipping Tool For Custom Screenshots
To take a screenshot on your Gateway laptop, you can use the built-in Snipping Tool. The Snipping Tool allows you to capture custom screenshots in different modes including full-screen, window, rectangular, and free-form. Once you have taken a snip, you can save and edit it as per your requirements. Accessing and navigating the Snipping Tool is simple and intuitive, making it easy to capture specific parts of your screen. This tool provides flexibility and control over the screenshots, ensuring that you can capture exactly what you need. Whether it’s for work, personal use, or troubleshooting, the Snipping Tool on Gateway laptops offers a convenient way to capture and manage your screen captures.
Advanced Screenshot Functions
When it comes to taking a screenshot on your Gateway laptop, there are advanced functions to explore that can enhance your experience. Utilizing the Windows Game Bar for capturing screenshots during gaming is a convenient feature. You can use shortcut keys within the Game Bar for quick access to screenshot functions. Additionally, the Game Bar allows you to record your screen, making it easy to capture and save gameplay moments. This makes it a versatile tool for both screenshots and video recording, providing a seamless experience for gamers.
Third-party Screenshot Tools
When it comes to taking a screenshot on a Gateway laptop, using third-party screenshot tools can provide additional features and benefits. There are several popular screenshot software options available for Gateway laptops. Each software offers unique capabilities, so doing a comparison of these tools is essential to determine the best fit for your needs.
After selecting a suitable software, the next step involves installing and configuring the chosen third-party screenshot application on your Gateway laptop. This process ensures that the software is properly integrated and ready to use for capturing screens effectively. By exploring and understanding the additional features and benefits provided by these tools, users can optimize their screenshot-taking experience on their Gateway laptops.
Troubleshooting Common Issues
When troubleshooting common issues with taking a screenshot on a Gateway laptop, it’s important to address non-responsive screenshot keys. If the PrtScn or Print Screen key isn’t working, adjusting settings for the Snipping Tool and Game Bar can help resolve this issue. Additionally, make sure that the Game Bar is enabled and that the keyboard shortcuts for taking a screenshot are properly configured. To ensure successful screen captures on Gateway laptops, familiarize yourself with the specific key combinations or shortcuts for taking screenshots. Pay attention to any specific instructions for capturing the entire screen or a selected area. Understanding and utilizing these features can greatly enhance your screenshot-taking experience on a Gateway laptop.
Sharing And Managing Screenshots
How to Take a Screenshot on Gateway Laptop is a common query for users looking to capture their screen effectively. By default, saved screenshots on a Gateway laptop are usually stored in the Pictures folder within a subfolder labeled “Screenshots.” Utilizing built-in tools on the laptop, such as the Snipping Tool or the Snip & Sketch app, allows for easy editing and annotating of screenshots before sharing. It’s important to consider best practices for secure and efficient sharing, as sensitive information could be inadvertently included in the screenshot. Therefore, being mindful of what is captured and shared is essential to protect privacy and security.
Frequently Asked Questions On How To Take A Screenshot On Gateway Laptop
How Do I Take Screenshots On My Laptop?
To take a screenshot on a laptop, press the “PrtScn” or “Print Scrn” button. On Windows, this copies a screen image to the clipboard.
How Do You Screenshot On A Windows 11 Gateway?
To take a screenshot on a Windows 11 Gateway, press the “Windows key” + “Shift” + “S” keys simultaneously.
How Do You Screenshot On A Gateway Chromebook?
To take a screenshot on a Gateway Chromebook, press the Screenshot key. If your Chromebook doesn’t have this key, press Shift + Ctrl + Show windows and select Screenshot.
How Do I Record My Screen On My Gateway Laptop?
To record your screen on your Gateway laptop, press the Windows key + G to launch the Game Bar. Then click on the record button to start recording.
Conclusion
Knowing how to take a screenshot on your Gateway laptop is an essential skill for capturing and sharing information. Whether you use the traditional PrtScn button or opt for the Windows key and “Shift”+”S” keys, these methods can greatly enhance your productivity.
With the provided tips and shortcuts, you can now easily take screenshots on your Gateway laptop and streamline your daily workflow.