To take a screenshot on a Gateway laptop, simply go to the screen you want to capture and press the “Print Screen” key on your keyboard. Another option is to press the Windows key and the “Shift” + “S” keys simultaneously to take a screenshot on your Gateway laptop.
These methods allow you to quickly capture what’s on your screen for various purposes. Capturing a screenshot on your Gateway laptop is a straightforward process, and understanding the different methods can be incredibly useful. Whether you need to share important information or simply want to save something for future reference, knowing how to take a screenshot on your laptop can streamline your workflow.
By utilizing the designated keys on your keyboard, you can effortlessly capture and utilize screenshots on your Gateway laptop.
Basics Of Taking Screenshots
To take a screenshot on your Gateway laptop, you can use the “Print Screen” key to capture the entire screen. Another method is to press the Windows key and “Shift”+ “S” keys simultaneously for a quick screenshot. If you want to capture only the active window, press “Alt” + “Print Screen” (Alt + PrtScn) and then paste it into an image editing program like Paint using “Ctrl” + “V”. Additionally, using the “Windows key + PrtScn” keys simultaneously is a quick way to capture and save the screenshot. These methods are useful for capturing images of your laptop screen to share with others or for your personal reference.
Gateway Laptop Screenshot Methods
When taking a screenshot on your Gateway laptop, you can press the ‘Print Screen’ (PrtScn) key to capture the whole screen. Alternatively, for selective captures, use the Windows Snipping Tool or the Windows Game Bar for in-app screenshots. Another method involves pressing the Windows key and the “Shift” + “S” keys simultaneously. For capturing only the active window, press “Alt” + “Print Screen” (Alt + PrtScn), and then paste the screenshot into an image editing program like Paint using “Ctrl” + “V”. When using the Windows Game Bar, simply press the Windows key + G to open it and then click on the camera icon to capture in-app screenshots.
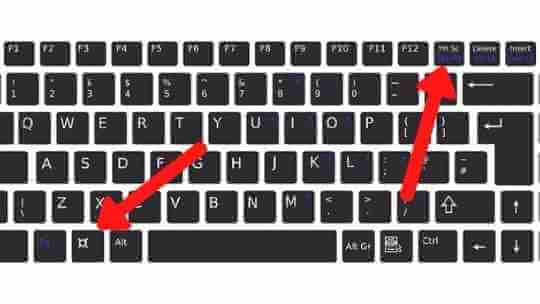
‘print Screen’ Key: Your First Method
When it comes to taking a screenshot on your Gateway laptop, the first method you can use is the ‘Print Screen’ key. This key is typically located at the top right of your keyboard and may be labeled as ‘PrtScn’ or ‘PrtScr’. By pressing this key, you can capture a full-screen image of your laptop’s display. Additionally, if you want to capture an active window only, you can use the ‘Alt’ + ‘Print Screen’ key combination. Once you have captured the desired screenshot, you can save it to a file or clipboard for further use.
Harnessing Built-in Windows Tools
To take a screenshot on a Gateway laptop using built-in Windows tools, you have several options. You can use the “Print Screen” key to capture the entire screen. Alternatively, press the Windows key along with “Shift” and “S” keys simultaneously to access the snipping tool for custom screenshots. If you prefer, you can use the Snip & Sketch tool for more advanced custom snips. Additionally, for capturing only the active window, press “Alt” and “Print Screen” keys and then paste it into an image editing program. Another option is to use the Xbox Game Bar for recording your screen. These methods provide easy and effective ways to capture and record your laptop’s display.
Third-party Solutions For More Flexibility
When capturing screenshots on a Gateway laptop, third-party solutions offer more flexibility, such as dedicated screenshot applications with enhanced features and editing capabilities. These third-party tools provide advantages such as customizable capture options, annotation tools, and easy sharing methods.
One of the recommended tools for capturing screenshots on a Gateway laptop is a third-party software that provides advanced editing features, including image cropping, text overlay, and highlighting. Additionally, these solutions offer flexibility in capturing specific areas of the screen, making them ideal for various use cases.
Transferring Screenshots From Your Gateway Laptop
When it comes to taking a screenshot on a Gateway laptop, you can use the “Print Screen” key on the keyboard to capture the entire screen. Once captured, the screenshot can be located and saved in the “Screenshots” folder within the “Pictures” directory. For efficient file management, consider organizing your screenshots into specific folders and utilizing descriptive filenames to easily locate them in the future. Additionally, you can share these screenshots via email or through various social media platforms, or consider uploading them to cloud storage services for safekeeping and easy access.
Credit: laptopsidea.com
Frequently Asked Questions For How To Take A Screenshot On A Gateway Laptop
How Do I Take A Screenshot On My Gateway Windows 11?
To capture a screenshot on your Gateway Windows 11, simply press the “Print Screen” key. If you want to capture only the active window, use “Alt” + “Print Screen. ” You can then paste the screenshot into an image editing program like Paint.
For a specific area screenshot, use the Windows key + “Shift” + “S. “
What Are 3 Ways To Take A Screenshot On A Laptop?
To take a screenshot on a Gateway laptop, you can use the “Print Screen” key, press “Windows” + “Shift” + “S” keys simultaneously, or press “Alt” + “Print Screen” for an active window.
How Do You Screenshot On A Gateway Chromebook?
To capture a screenshot on a Gateway Chromebook, press the “Ctrl” and “Switch window” keys simultaneously. This will capture the entire screen.
How Do I Record My Screen On My Gateway Laptop?
To record your screen on your Gateway laptop, press the “Windows” key and the “Shift” + “S” keys simultaneously. This captures the screen.
Conclusion
Capturing a screenshot on your Gateway laptop is easy using various methods. You can use the “Print Screen” key, Windows key with “Shift” + “S” keys, or “Alt” + “Print Screen” for specific windows. Familiarizing yourself with these techniques allows for effortless sharing and saving of important visuals.