To take a screenshot on a Gateway laptop, press the “Print Screen” key on your keyboard. Then, paste the screenshot into a program like Paint and save it.
Capturing a screenshot on a Gateway laptop is simple and requires just a few quick steps. Whether you want to memorialize an important document, capture a funny meme, or save an error message for troubleshooting, knowing how to take a screenshot is a valuable skill.
With this easy guide, you’ll be able to capture and save screenshots on your Gateway laptop with ease. Whether you’re a student, professional or casual user, learning how to take screenshots on your laptop can enhance your productivity and help you save important content for later reference. So, let’s dive in and learn how to take a screenshot on your Gateway laptop.
Gateway Laptop Screenshot Basics
Gateway laptops offer a convenient way to capture screenshots, allowing users to easily capture and share important information, images, or error messages. The process of taking a screenshot on a Gateway laptop is a common need for many users, whether for work, personal use, or troubleshooting purposes. In this guide, we’ll explore the essential aspects of taking a screenshot on a Gateway laptop, including the functionality, importance, and available tools.
Understanding The Functionality
Taking a screenshot refers to the process of capturing an image of the current display on your Gateway laptop screen. This functionality allows users to preserve and share valuable information, such as images, text, or error messages, without the need for external devices or software. Whether you want to save an important document, capture a memorable moment, or troubleshoot a technical issue, the ability to take a screenshot on your Gateway laptop is a vital feature.
Importance Of Taking Screenshots
- Documentation: Screenshot capture serves as a powerful documentation tool, enabling users to preserve visual evidence of important information, discussions, or errors.
- Communication: Screenshots facilitate effective communication by allowing users to illustrate specific points, share visual content, or provide step-by-step instructions.
- Troubleshooting: When encountering technical issues, screenshots can aid in describing and sharing error messages or display anomalies, which can be crucial for seeking assistance or troubleshooting.
Tools Available On Gateway Laptops
Gateway laptops come equipped with built-in tools that enable users to take screenshots without the need for third-party software. The most common methods for capturing a screenshot on a Gateway laptop include using the Print Screen key or utilizing the Snipping Tool. These native features provide convenient and efficient ways to capture and save screenshots for various purposes.
Credit: laptopsidea.com
Step-by-step Screenshot Guide
If you are a Gateway laptop user, taking screenshots can be essential for various purposes, such as capturing important information, documenting errors, or simply sharing something interesting with others. In this step-by-step screenshot guide, you will learn how to effortlessly capture screenshots on your Gateway laptop using the keyboard shortcuts. Whether you want to capture the entire screen, specific windows, or applications, this guide has got you covered.
Utilizing Keyboard Shortcuts
Taking a screenshot on your Gateway laptop can be efficiently done using the keyboard shortcuts, which provide a quick and convenient way to capture your screen without the need for additional software.
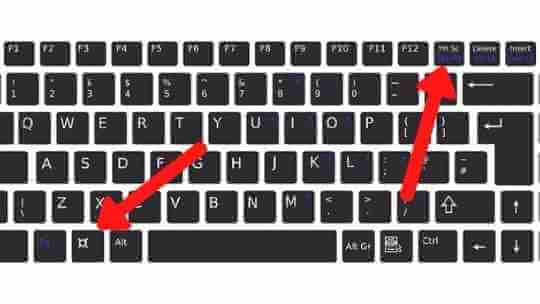
How To Capture The Entire Screen
To capture the entire screen, press the PrntScrn key on your keyboard. This will instantly capture an image of the entire screen and save it to the clipboard for easy access.
How To Capture An Active Window
If you want to capture a specific active window or application, press the Alt + PrntScrn keys simultaneously. This will capture the active window and save the screenshot to the clipboard.
Where Screenshots Are Saved
After capturing a screenshot using the keyboard shortcuts, the image is saved to the clipboard. To access the screenshot, you can simply paste it into an image editing software, email, or any other desired location for further use.
Editing Your Gateway Screenshot
In this section, we will explore the various ways to enhance and customize your captured screenshots on a Gateway laptop. Whether you need to highlight important details or simply want to improve the overall presentation, editing your Gateway screenshot can greatly enhance its effectiveness. Let’s dive into the different methods available for modifying and refining your screenshots.
Using Built-in Editing Tools
Gateway laptops offer a range of built-in editing tools that simplify the process of annotating, highlighting, and adding text to your screenshots. By using these tools, you can easily customize your screenshots without the need for additional software. The built-in editing options make it simple to create professional-looking screenshots with minimal effort.
Options For Cropping And Annotating
Cropping and annotating your Gateway screenshots allows you to focus on specific details and convey your message clearly. Utilize the cropping function to remove unnecessary elements and refine the composition of your screenshot. Additionally, annotations can be added to emphasize key aspects of the captured content, making it more engaging and informative.
Saving Your Edited Screenshot
After editing and customizing your screenshot, it’s crucial to save the final version in a suitable format. Ensure that the edited screenshot is saved in a high-quality image format to preserve the clarity and detail of the modifications. Saving the edited screenshot enables you to use it across various platforms and share it effortlessly.
Screenshot Alternatives On Gateway
When it comes to taking a screenshot on a Gateway laptop, there are various options you can explore. Aside from using the standard Windows methods, Gateway laptops also offer alternatives for capturing screens in a more customized manner. In this article, we will discuss these alternatives in detail and explore the different software options available for taking screenshots on a Gateway laptop.
Third-party Tools For Advanced Features
If you’re looking for advanced features to enhance your screenshot capabilities on a Gateway laptop, third-party tools are a great option. These tools often offer additional functionalities that may not be available through standard Windows methods. Some popular third-party tools for taking screenshots on Gateway laptops include:
- Snagit: An advanced screenshot and screen recording tool that provides a wide range of editing and annotation features.
- Lightshot: A lightweight and user-friendly screenshot tool that allows for easy capturing and editing of screenshots.
- Greenshot: A free and open-source screenshot tool with advanced editing and annotation capabilities.
How Do You Take A Screenshot With Software Options
Gateway laptops come with built-in software options for taking screenshots, providing users with a seamless and convenient way to capture their screens. Here are some of the software options available for taking screenshots on a Gateway laptop:
- Snipping Tool: This built-in Windows tool allows you to capture a custom area of the screen and save it as an image.
- Snip & Sketch: A modern screenshot tool that offers a range of editing and annotation features for capturing and customizing screenshots.
- Print Screen (PrtScn) key: Utilize the Print Screen key on your Gateway laptop’s keyboard to capture the entire screen or Alt+Print Screen to capture the active window.
Sharing Gateway Laptop Screenshots
Sharing screenshots from your Gateway laptop can be a valuable way to communicate visually. Whether it’s for work, personal use, or troubleshooting, ensuring you know the best practices for sharing screenshots is essential. In this guide, we will explore the methods for sharing screenshots via email and social media and also emphasize the importance of respecting privacy when sharing screens.
Best Practices For Sharing Screenshots
When sharing screenshots, it’s important to consider the context and audience. Always provide context and a clear explanation of the screenshot’s relevance. Additionally, consider using annotations or highlights to draw attention to specific areas. Providing a brief description or caption can help the recipient understand the purpose of the screenshot.
Methods To Share Via Email And Social Media
Sharing screenshots via email can be done by simply attaching the screenshot to the email. Another method is to embed the screenshot directly into the body of the email. When sharing on social media platforms, consider using image sharing features or uploading the screenshot as an image post. Ensure that the platform’s privacy settings align with your desired audience before sharing.
Respecting Privacy When Sharing Screens
Respecting privacy when sharing screenshots is crucial. Always ensure that sensitive information is redacted or blurred before sharing. If sharing with a broader audience, obtain consent from individuals whose information may be visible in the screenshot. It’s essential to maintain respect for privacy and confidentiality in all sharing instances.
Frequently Asked Questions For How Do You Take A Screenshot On A Gateway Laptop
How Do I Take A Screenshot On My Gateway Laptop?
To take a screenshot on your Gateway laptop, press the “PrtScn” or “Fn + PrtScn” keys. Then, open an image-editing program, such as Paint, and press “Ctrl + V” to paste the screenshot. Finally, save the image to your desired location.
Can I Take A Screenshot Of A Specific Window On My Gateway Laptop?
Yes, you can. Press “Alt + PrtScn” to capture a screenshot of the currently active window on your Gateway laptop. The image will be copied to the clipboard, allowing you to paste it into an image-editing program for further use or saving.
Is There An Alternative Method To Take A Screenshot On A Gateway Laptop?
Indeed, there is an alternative method to take a screenshot on a Gateway laptop. You can use the “Snipping Tool” or “Snip & Sketch” feature, depending on your laptop’s operating system. These tools allow you to capture custom-sized screenshots of your display.
What Should I Do If The “prtscn” Key Doesn’t Work On My Gateway Laptop?
If the “PrtScn” key doesn’t work, try using the “Fn + Windows + Spacebar” or “Fn + Alt + PrtScn” shortcut on your Gateway laptop. Additionally, you can troubleshoot by updating your keyboard drivers or using third-party screenshot capture software to overcome the issue.
Conclusion
In a nutshell, taking a screenshot on a Gateway laptop is a simple and handy process that can be accomplished using various methods. Whether you prefer using the built-in keyboard commands or dedicated third-party software, capturing and sharing your screen has never been easier.
With this newfound knowledge, you can now effortlessly capture and save any on-screen content with just a few clicks.