To fix a speaker dust cap, carefully remove the damaged cap, replace it with a new one and attach it using appropriate adhesive. An alternative glue, such as superglue, epoxy or impact adhesive, can be used for the installation.
A dent in the dust cap does not significantly alter the speaker’s sound quality, and it is possible for the speaker to function without a dust cap, but it may be more susceptible to damage. Additionally, there are simple DIY methods for fixing pushed-in dust caps, such as using white glue or a sewing pin to leverage it back out.
If you encounter a damaged speaker dust cap, it can be fixed with a few simple steps. By using the appropriate adhesive and carefully installing a new cap, you can restore your speaker’s functionality and maintain its performance. It is important to address such issues promptly to prevent any further damage and ensure the optimal sound quality of your speaker system.
Credit: speakerrepairshop.nl
Assessing The Damage
When assessing damage to a speaker dust cap, it is essential to visually inspect the cap to determine the type of material it is made of, whether it is cloth, paper, metal, or plastic. Additionally, considering the extent of the dent or puncture is crucial in determining the appropriate repair method.
Preparing The Work Area
When preparing to fix a speaker’s dust cap, it is essential to gather necessary tools and materials beforehand. The tools may include a screwdriver, utility knife, tweezers, and adhesive, while the materials needed could be a replacement dust cap and a static-free cloth. Creating a clean, static-free workspace is crucial to prevent any damage to the speaker. Additionally, prioritizing safety and care during the repair process ensures the protection of both the speaker and the person performing the repair. These preparatory steps lay the foundation for a successful dust cap fix.
Speaker Disassembly Tips
When disassembling a speaker, it is crucial to identify the screws and fasteners used to secure the components. Carefully removing these components ensures the process is seamless. Begin by safely removing the speaker driver without causing any damage. It is important to keep track of all the components that are being disassembled. Keeping them organized will make reassembly much easier. Additionally, it’s important to note the placement of screws and fasteners to avoid confusion during reassembly. Properly executing these steps will help in successfully fixing the speaker dust cap.
Dust Cap Removal Techniques
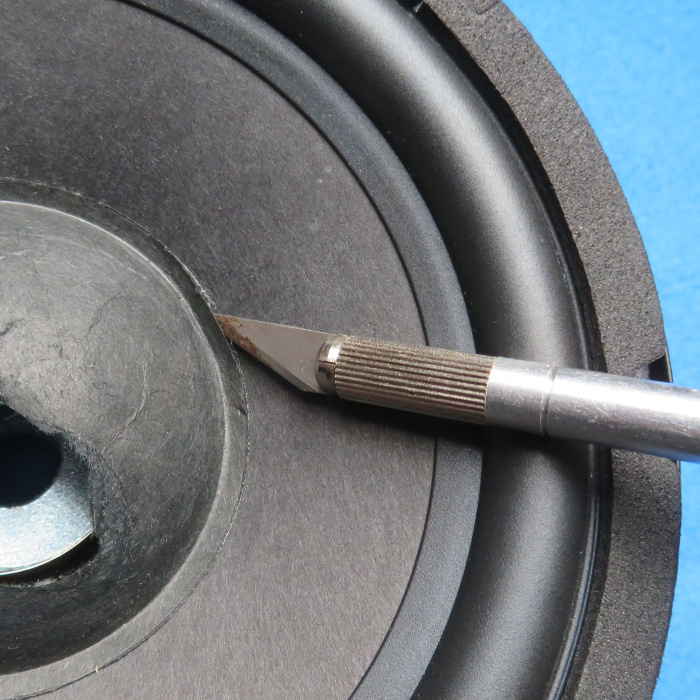
Removing a dented dust cap from a speaker requires gentle techniques to avoid causing further damage. Using a vacuum cleaner or suction cup can help lift the cap without putting too much pressure on the delicate components. Additionally, carefully inserting a thin blade or putty knife around the edges can aid in detaching the dust cap. It’s crucial to have the right tools like a heat gun, soft bristle brushes, and adhesive remover to ensure a smooth removal process without harming the voice coil and speaker cone. Preserving these components is essential to maintain the speaker’s performance. It’s recommended to exercise caution and patience when undertaking this task to prevent any mishaps.
Smoothing Out Dents
When it comes to smoothing out dents on the speaker dust cap, you can use various techniques for repairing minor dents. One technique involves using household items for fixing metal or plastic caps. It’s important to handle the repair process carefully and ensure that the dust cap is restored to its original shape without causing any further damage. Using gentle pressure and patience, you can gradually work out the dent from the dust cap. Another method involves utilizing DIY repair kits available in the market that provide specialized tools and materials for addressing dents. By following the proper steps and techniques, you can effectively restore the integrity of the speaker dust cap and ensure optimal audio quality.
Choosing The Right Adhesive
When fixing a speaker dust cap, it’s important to choose the right adhesive to ensure a secure and long-lasting repair. Various glue options are available, each with different drying times, so you can select the one that best suits your needs. Whether using thin superglue for accurate placement or impact adhesive for more confidence, it’s crucial to choose a glue suitable for the speaker’s paper-based cone. Additionally, you can consider using epoxy or even PVA for effective results.
To apply the adhesive without causing any damage, it’s recommended to carefully follow the manufacturer’s instructions and apply the glue evenly. Taking precautions during the application process will help prevent any further damage to the speaker. Additionally, ensure that the adhesive is fully dried before using the speaker to avoid any potential issues with the repair.
Dust Cap Replacement
When it comes to speaker maintenance, it’s essential to find the right size and type of replacement dust cap. Select a dust cap that matches the specifications of your speaker cone to ensure proper alignment and seal. Follow these steps for a smooth replacement process: gently remove the old cap, clean the surface, apply adhesive to the rim of the cone, carefully place the new cap and ensure a secure bond. It’s crucial to use the correct adhesive for a long-lasting repair. Once the new cap is in place and the adhesive has set, your speaker will be ready for use with a properly aligned and sealed dust cap.
Fine-tuning And Aesthetic Considerations
When it comes to fixing a speaker dust cap, it is important to match the dust cap to the speaker’s aesthetic to ensure functional restoration doesn’t compromise style. By carefully selecting a dust cap that complements the speaker’s overall look, you can maintain the visual appeal of the speaker while restoring its functionality. Additionally, choosing the right adhesive is crucial to secure the dust cap in place without compromising its appearance. You can consider using impact adhesive, epoxy, or PVA for paper-based cones, ensuring a secure and seamless attachment.
Testing And Quality Assurance
Testing and Quality Assurance: When repairing a speaker dust cap, it is crucial to ensure that the repaired speaker functions optimally. Post-repair, thorough listening for abnormalities and confirmation of fix is imperative. This methodology aids in identifying any leftover issues and ensuring that the speaker performs as expected.
Post-repair Maintenance
After repairing the speaker dust cap, it is essential to store the speaker properly to prevent future damage. Ensure the speakers are stored in a cool, dry place to maintain their integrity. Avoid exposing them to excessive moisture or humidity. Additionally, it is advisable to store the speakers in a protective case or cover them with a cloth when not in use to prevent dust or debris from settling on the dust cap. Regularly cleaning the speakers and inspecting the dust caps for any signs of damage can also help in ensuring the longevity of the repaired dust cap.
Frequently Asked Questions On How To Fix Speaker Dust Cap
What Kind Of Glue To Use On Speaker Dust Cap?
You can use thin superglue for accurate placement or impact adhesive, epoxy, or PVA for a paper-based cone.
Does A Dented Speaker Dust Cap Affect Sound?
A dented speaker dust cap can affect sound quality by altering air pressure within the speaker, potentially causing distortion. Prompt repair or replacement is recommended to maintain optimal performance.
Can A Speaker Work Without A Dust Cap?
Yes, a speaker can work without a dust cap, but it may be vulnerable to damage from blowing sand or dust. It’s best to find a replacement cap or have a professional install one.
How Do You Fix A Crushed Speaker Dome?
To fix a crushed speaker dome, carefully remove the old cap, and attach the replacement using adhesive. Consider using superglue, impact adhesive, epoxy, or PVA for paper cones. A dented dust cap won’t significantly affect sound, and speakers can run without one, but they may be vulnerable to dirt.
Conclusion
Fixing a speaker dust cap can be a simple DIY task with the right tools and techniques. Whether it’s repairing a dented cap or replacing it entirely, this guide has provided valuable tips and methods. By following these steps, you can restore your speaker’s functionality and ensure optimal sound quality for your audio equipment.